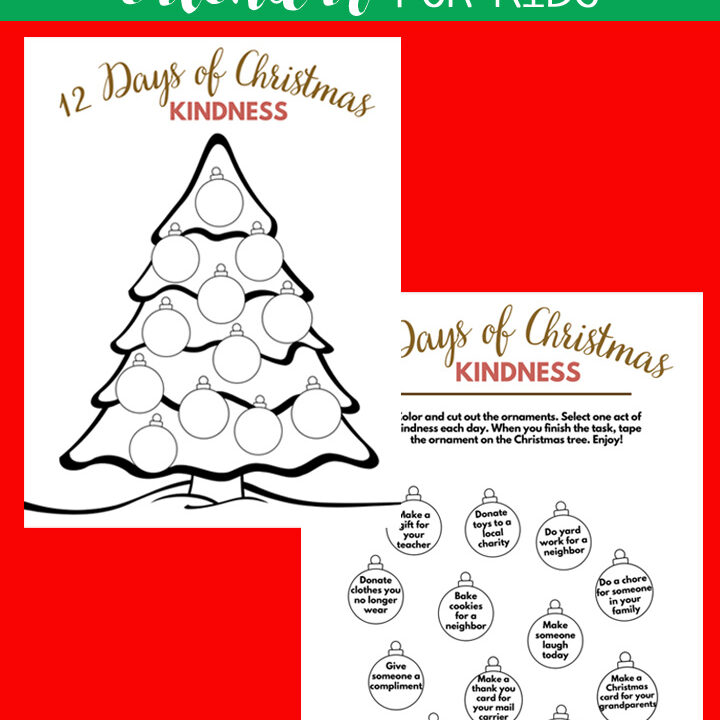
all crafty things

  • home
  • crafty things
  • holidays
    • Christmas
    • Valentine’s Day
    • Easter
    • Thanksgiving
  • seasonal
    • Spring
    • Summer
    • Fall
    • Winter
  • Celebrations/Vacations
  • Tips & Tricks
  • policies & submissions
  • About Linda
Uncategorized

How to Decorate a Vase {Using Mod Podge!}

September 30, 2020

Looking for an easy and quick way to decorate a plain vase? Use this idea for vases around your home, easy gifts, or for party decor!

I love easy craft ideas that don’t cost a lot of money.

If you have a collection of plain jane vases lying around your house, you’ll want to try this easy method for decorating them!

decorate a vase

How to Decorate a Vase {Using Mod Podge!}

Full DIY card is below!

Here’s what you’ll need to make one of your own…

how to decorate a vase

In the DIY card, I linked to a watercolor pan set, which may be easier if you’re a beginner. The tube watercolors are great, but tend to be a bit more expensive.

Or, you can learn how to make natural pigments if you’d like to DIY the process!

Here’s my paper, cut to fit my jar and ready for the next step!

diy vase

And here’s my paper halfway through my painting, and then when I was done!

watercolor on paper
watercolor paper

My jar is coated with Mod Podge, and ready for the (dry!) paper to be inserted….

vase diy

Added my small jar with water to my larger jar, inserted my flowers and voila!

mod podged vase

How to Decorate a Vase

watercolor vase

Looking for an easy and quick way to decorate a plain vase? Use this idea for vases around your home, easy gifts, or for party decor!

Active Time 20 minutes
Total Time 20 minutes
Difficulty easy
Estimated Cost $20

Materials

  • Mod Podge Gloss
  • 2 Glass Containers (One to Fit Inside the Other)
  • Foam Brush
  • Watercolors
  • Watercolor Paper
  • Paintbrush

Instructions

    Gather your supplies and cut a piece of your watercolor paper to fit inside your glass jar.

    The best glass jars not tapered; they have straight sides. This will help make adhering the paper inside the jar easier. You’ll also need a smaller jar to fit inside the larger jar.

    I found both of my jars at Hobby Lobby for under $4!

    Use your watercolors to paint your paper. You could also do this project with scrapbook, wrapping or leftover wallpaper!

    I’m not a watercolor expert, but I’ll try to talk you through what I did:)

    I started by applying shades of blue and green across the paper, using plenty of water.

    Then, I went back and added swashes of color, blending as I went and adding more water as needed to help the colors blend together. Let dry completely.

    Once paper is fully dry, coat the inside of your jar with Mod Podge.

    Insert your paper, and press firmly to adhere it to the jar. Once dry, apply several coats of Mod Podge over the paper, letting dry between coats.

    Once dry, take your smaller jar and insert it into your larger one. Since Mod Podge isn’t waterproof, you won’t want to add water directly to your vase.

    Cut your flower, insert into your vase, and you’re done!

© admin
Category: crafty things

Thanks so much for reading all about how to decorate a vase!

Have a lovely day!


crafty things

Crafts to Do When Bored {Easy Craft Ideas with Materials You Probably Already Have}

September 30, 2020

Spending more time at home lately? Looking for crafts to do when bored?

Here are some quick and easy ideas!

Like most of you, my family has been spending much more time at home than we normally do.

This has some benefits, mainly that we’re spending less on food and activities.

But it also has some drawbacks. The biggest one is that we’re often bored from hanging out at home all the time.

So today, I’m sharing some easy and quick crafts to do when you’re bored!

Keep this list handy for the next time you have a spare hour to kill and you’re not sure what to do with yourself.

Crafts to Do When Bored

Crafts to do When Bored

Spending more time at home lately? Looking for crafts to do when bored?

Here are some quick and easy ideas!

Photo Credit: www.burlapandblue.com

Slime Recipe {An Easy Glitter Slime Kids Craft}

Have you and your kids jumped on the glitter slimes bandwagon yet? If not, you should!

This Elmers Glue Glitter Slime Recipe is easy, inexpensive and the kids will LOVE helping you make it!

Photo Credit: www.burlapandblue.com

DIY sharpie mugs + free printable tags

Sharpie Mugs are so easy, no art skills required!

Using Sharpie Paint Pens, I’ll show you how to create three different Sharpie mugs, plus share some free printable gift tags!

Photo Credit: www.burlapandblue.com

watercolor tote bag {a tutorial}

Remember those small watercolor pallets that you used as a little kid? Those ones where all the paint colors would eventually mix into one brown color?

Hahah, there is no shame. We all did it. Well this DIY project is like the adult version to those children watercolor paints.

Photo Credit: www.burlapandblue.com

watercolor canvas art {a tutorial}

Love watercolor art? You can make these watercolor canvases, even if you’re not an artist!

This tutorial will show you how!

Photo Credit: www.burlapandblue.com

how to mod podge a vase {a tutorial}

Looking for an easy craft idea?

Today, I’m sharing all about how to Mod Podge a vase! This watercolor vase is so pretty and versatile–read on for the how to!

Photo Credit: allcraftythings.com

How to Make Marbled Nail Polish Mugs

Nail polish mugs are an easy and quick craft project!

Make them for yourself and your own home, or make a batch to give as gifts! 

Photo Credit: allcraftythings.com

Glitter Plates {An Easy Mod Podge Craft}

Often, when I don’t have a lot of time to devote to being creative, a 30 minute craft is just the thing to get my crafty fix.

I found these simple plates at Target in the kids crafting section, and knew I could take my trusty Mod Podge and do something fun with them. 

Photo Credit: allcraftythings.com

Hanging Succulents - How to Make a Hanging Succulent Planter

Need a trendy way to display your hanging succulents?

I’ve got you covered with my Hanging Succulent Planter!

Photo Credit: allcraftythings.com

Easy Painted Rock Ideas - all crafty things

Painted rocks are such a fun, trendy and easy craft idea; this post is sharing some of my very favorite, and very easy, ideas for painting your own rocks!

Photo Credit: www.burlapandblue.com

Make a DIY Pillow Fort {With Free Printables!}

It’s the perfect rainy day activity!

Learn how to make a DIY pillow fort, with free printables!

Thanks so much for reading all about our favorite Crafts to Do When Bored {Easy Craft Ideas with Materials You Probably Already Have}.

Have a lovely day!


crafty things

Bakers Twine Crafts and DIYs

September 24, 2020

Bakers twine is so versatile for crafts and DIYs! Here are some of my very favorite uses for bakers twine!

As a crafter, I love working with all sorts of crafting mediums.

I especially love using craft supplies that are inexpensive and versatile!

Bakers twine definitely falls into that category!

bakers twine crafts

This is one of my favorite sets of bakers twine. It comes in many different colors and will last you a long time!

Bakers Twine Crafts and DIYs

Bakers Twine Crafts & DIY Ideas

Bakers twine is so versatile for crafts and DIYs! Here are some of my very favorite uses for bakers twine!

Photo Credit: www.burlapandblue.com

Erie Insurances’ Survey of Homeowners and DIY Artwork Displays

This is one of my very favorite ways to use bakers twine!

Simply use command hooks to string bakers twine along a wall, and use clothespins to display your child's artwork!

An easy and inexpensive way to fill a blank wall in a nursery or playroom!

Photo Credit: www.burlapandblue.com

how to package homemade soap

If you love to make homemade soap for gifts or to sell, bakers twine is the perfect way to tie off your soap packaging!

Wrap your soap in tissue, kraft or wrapping paper, and tie off with a piece of twine for a simple and impressive presentation.

Photo Credit: www.burlapandblue.com

snowman candy bars

These snowman candy bars are always popular when colder weather hits, and they're super easy to make with printer paper, some ink and bakers twine!

Photo Credit: www.burlapandblue.com

doily and watercolor garland {a tutorial}

Twine is perfect for stringing together watercolored doilies (or anything, really) for a cute and easy garland!

Photo Credit: liagriffith.com

Mini DIY Pom Poms from Baker's Twine

 Using a simple dining fork or even a salad tong for a larger pom makes this a fast, eye-catching topper for any gift or colorful party decorations.

The ideas on where to use these are endless.

Photo Credit: www.gomakeme.com

{go make me} a simple tassel

Here's a tutorial on how to make very simple tassels...add them to your craft projects, use on gift wrapping, breathe new life into an old scarf or simply use for decoration

Photo Credit: www.domestically-speaking.com

Learn how to make a String Art Heart with Bakers Twine.

This twine heart is perfect for valentines day decor....or you can even leave it up year round!

Simple and super cute!

Photo Credit: modpodgerocksblog.com

Wrap Votives with Baker's Twine

Amy from Mod Podge Rocks shows you how to create a unique votive with your favorite shades of baker’s twine and Mod Podge.

Baker’s twine crafts are some of the easiest you’ll ever do . . . no expertise needed.

Photo Credit: www.domestically-speaking.com

Baker's Twine Apple Art

Love fall crafts? Here's one you'll adore!

Love this easy bakers twine apple art!

Photo Credit: cutesycrafts.com

Baker's Twine Cookie Cutter Ornaments

I just love baker’s twine! 

I love the colors, and I love the look!  Baker’s twine was traditionally used to wrap baked goods, so Jessica from Cutesy Crafts had this idea to wrap it around metal Christmas cookie cutters to make ornaments. 

Did you find a new bakers twine craft to try? I hope so!

Thanks so much for reading all about our favorite Bakers Twine Crafts and DIYs.

Have a lovely day!


crafty things

How to Make a Personalized Vinyl Tumbler

September 10, 2020

Looking for an easy gift idea? Or maybe a creative craft to make and sell? These Personalized Vinyl Tumblers are inexpensive to make and are the perfect gift giving idea!

I’m always on the lookout for easy craft and gift ideas.

These personalized tumblers just require two supplies: clear tumblers with straws, and vinyl decals!

vinyl tumbler

Step 1: All you need for this project are the decal kits from Belvedere Designs (click here for the Single Monogram Tumbler Decal Kit, and here for the Triple Monogram Decal Kit) and plain acrylic tumblers.

clear tumblers

Step 2: Let’s begin!

We’ll be doing this in two parts. We’ll first apply the initial decal and then we’ll apply the polka dot decals. First, place the initial on the cup, and, using the tape as a hinge, flip up decals and peel off backing.

Lay decal back down carefully. Starting from the center, squeegee the vinyl decals firmly. 

Carefully peel back the transfer tape. To do this, start at a corner and peel the transfer tape off at a 180 degree angle-back and down rather than up and away.

If necessary, use your fingers to press down on the letters as you peel back the tape.

vinyl tumbler

Step 3: Using the same technique, apply each of your polka dots onto your tumblers.

vinyl tumbler

And that’s it! I made two for my son’s preschool teachers at the end of last year and filled with them single serve drink packets. I kept the third tumbler for myself 🙂

vinyl tumbler

Thanks so much for reading all about How to Make a Personalized Vinyl Tumbler!

Have a great day!


crafty things

How to Mod Podge an Outdoor Table

August 19, 2020

Looking for a fun and easy way to update a small outdoor table? See how we used Mod Podge to add some color and pattern to our outdoor space!

I love quick and easy DIY projects, especially when they involve one of my favorite crafting supplies: mod podge!

outdoor table redo

When I found this outdoor table at a local thrift store, I knew it would be perfect for my patio.

We love spending time outdoors, and we needed a spot to set down a book, or cup of coffee!

Full DIY card is below!

But here’s what you’ll need to do this easy DIY yourself!

I found this sheet of paper at Papyrus. I LOVE it, but unfortunately I cannot find it anymore.

I linked to some other fun options in the card below.

mod podge, scissors, foam brush

And here’s an in-process picture to give you an idea of how I wrapped the corners of my wooden table top.

How to Mod Podge an Outdoor Table

outdoor table

An easy and affordable DIY project using Mod Podge!

Materials

  • Outdoor Mod Podge
  • Table
  • Scrapbook Paper or Wrapping Paper
  • Foam Brush

Instructions

    Here’s my “before” image….basically, we found the iron frame at a thrift shop. I spray painted it (if you know me at all, that’s no surprise!), and had my husband cut a piece of wood to fit.

    The first thing I did was take my wooden top and coat it with Mod Podge Outdoor. I took my piece of wrapping paper (found at my local Papyrus store-isn’t it lovely?), and lay it across the top, smoothing it out with a credit card to make sure there were no air bubbles.

    Flip it over on a flat surface, and fold up the two ends and Mod Podge them down to the wood.

    Wrapping the paper around the tabletop was a bit tricky! Basically, I just folded each corner like I would wrap a gift, and Mod Podged it all in place.

    Once completely dry, seal it with 3 coats of Mod Podge. I normally only do two coats, but really wanted this to be well sealed! After that was dry, I used a clear sealer by Minwax to waterproof it.

Notes

A note about Outdoor Mod Podge: As Amy explains in her FAQ page, Outdoor Mod Podge is very durable and water-resistant, but not completely waterproof. If you want to make your project waterproof, She recommends using a clear, outdoor (or Enamel) acrylic sealer when your project is complete.


Category: crafty things

A note about Outdoor Mod Podge: As Amy explains in her FAQ page, Outdoor Mod Podge is very durable and water-resistant, but not completely waterproof.

If you want to make your project waterproof, She recommends using a clear, outdoor (or Enamel) acrylic sealer when your project is complete.

redo wooden table

UPDATE: This table lasted a few years being completely outdoors. After that, though, the paper started to pull apart from the table.

Again, outdoor Mod Podge isn’t 100% waterproof, so take that into account before undertaking a big project.

This project was quick and cheap, so I didn’t mind!

Thanks so much for reading all about How to Mod Podge an Outdoor Table.

Have a lovely day!


  • « Previous Page
  • 1
  • 2
  • 3
  • 4
  • 5
  • …
  • 48
  • Next Page »
Jennifer theme  |